© 2023 by SociaLight.
Proudly created with Wix.com
© 2023 by SociaLight.
Proudly created with Wix.com
© 2023 by SociaLight.
Proudly created with Wix.com
Join us at social media and Follow Us:
Join us at social media and Follow Us:
Join us at social media and Follow Us:
Join us at social media and Follow Us:
News Title
iVP Planning enables the simple, immediate representation and visualization of your planned factory or production plant in 2D/3D and VR.
datum


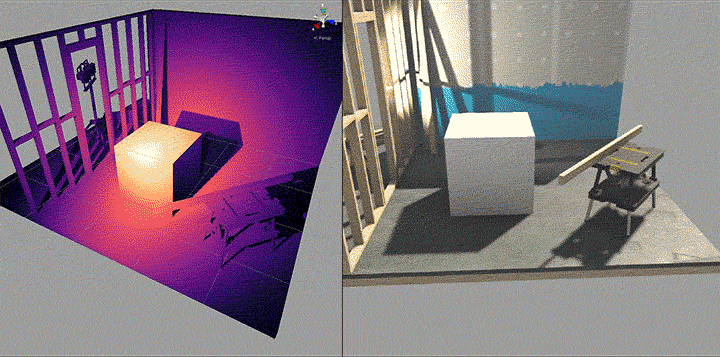
The Virtual Reality software STP VR helps police forces train for dangerous scenarios of their daily work on duty. Because body motion is tracked and recorded, each trainee's behavior can be analyzed in detail after a session has ended. At the core of this analysis software is a three-dimensional heat map, showing all the surface areas a particular player has been looking at, and for how long. If you imagine a camera as area light and the entire scene's surface covered in film stock, it captures which parts of the film were particularly exposed, and which weren't. In this article I'd like to break down my failed and successful approaches to implement this so called exposure map.

Left: accumulated exposure map. Right: view of the player camera.
IMPLEMENTING
AN EXPOSURE MAP
At each time interval the map should not only show which surfaces are currently exposed to a specific camera, but also which have been in the past: we need to accumulate data somewhere over a period of time. One naive approach is to break the scene down into a voxel grid. When a view ray from the camera hits an object, it increases the value of the voxel encompassing the intersection point. Although simple to implement, this method has a big memory footprint, because only few voxels intersect scene geometry. Most contain air or the inside of objects. In both cases they will never be able to register a ray intersection, thus wasting memory.
There exist gpu-based implementations for sparse 3D data structures that only store data at relevant locations, but to strike a balance between code complexity and performance, I decided to use good old 2D textures to store the exposure data. They introduce one extra step into the pipeline, though: 3D world positions have to be converted to 2D texture coordinates. Most models are UV-unwrapped for texturing anyways, but unfortunately those mappings can't be used directly. Many objects would map to the same place, as they don't consider each other in their UV layout. You could painstakingly plan assets so that they leave place for all other ones, but then you'd have to adjust them when new assets are introduced, and you can't easily reuse assets in other scenes.
In my case I got away with using the lightmap coordinates, because objects that needed to be part of the exposure map were receiving baked lighting anyway. Unity, my engine of choice, is able to assemble the lightmap layout automatically from each model's texture coordinates. If you don't use light mapping, you'd have to implement a tiling algorithm yourself, because the coordinates are not calculated for you, then.


The compute shader reads the UV pass (left) and writes into the atlas (right).
For reference, the blue lightmap layout is layed over the grayscale exposure values.
In whatever way each surface point (fragment) is assigned a unique texel in the exposure map, there is still a choice to make for how to write to it. I decided not to do that directly in the control view's fragment shader. Instead, another pass iterates over each pixel in the player's camera image to determine which atlas location it shows, then setting the exposure value at that location. At first this approach sounds unnecessarily complicated, but it makes calculating occlusion much easier. That is, excluding surface points outside the camera view frustum and ones hidden behind objects. Because this approach only shows fragments that end up in the final image, no additional visibility test is necessary.
To find the atlas location corresponding to each pixel in the player's view, the player camera first renders a UV pass showing each fragment's lightmap UV coordinate in the red and green channel, and the lightmap index in the blue channel. A second pass then reads this rendered image and writes the fragment's exposure to the atlas at that texture coordinate. This means a write location is known only after reading the corresponding UV pass pixel. Because fragment shaders can't write to arbitrary output locations, a compute shader is used instead. They are less efficient and not supported by older graphics libraries, but don't have this limitation.
Because a scene can consist of several lightmaps, the exposure map is actually stored in a texture array. The compute shader uses the blue channel from the UV pass to decide into which slice to write. Four lightmaps can be packed into one slice — one for each RGBA channel — to use memory more efficiently. The shader also attenuates exposure values of the current frame by a grayscale map. This can be used to add a vignetting effect, so that areas in the center of the player's view are exposed more quickly. Optionally, old values from earlier frames can be multiplied by a value close to but smaller than one to let them slowly fade out. This allows control over the time interval the exposure map visualizes.
Same as above, but now past exposures slowly fade out again.
In the last step, the control view is rendered with a shader that reads the exposure map at each fragment's lightmap coordinate and uses the resulting value as lookup for a gradient map, whose color is then returned. This way, the gradient is better perceivable than it would be in simple grayscale.
To conclude this article, I'd like to loose a few words on shortcomings of this method. Its biggest limiting factor is the resolution of the UV pass. Surface parts seen by the player from afar can project between two pixels in the pass image, making them invisible to the compute shader. Increasing the resolution will make the resulting ugly stripe patterns occur later, but never fully get rid of them. They can be better hidden by multiplying the exposure value with the distance between object and camera, calculated from the UV pass depth buffer. This also makes sense intuitively: objects seen from afar shouldn't contribute as much to the exposure map as objects examined up close. Unfortunately and for the same reason, stripe artifacts also occur when surfaces are seen from grazing angles, which is much harder to hide. One could randomly scatter the exposure map write position depending on view angle, or blur the map in an additional pass, but in both cases special care has to be taken to ensure values don't bleed onto neighboring UV islands.

Stripe artifacts from long object-camera-distances.

Stripe artifacts on the right cube face from grazing view angles.
ABOUT
THE AUTHOR
Hello. I’m David Kutschke at iXtenda.
Some people’s heart beats to solve math problems; others’ does to create art. Mine does both. Equipped with a background in Computer Science and an eye for aesthetics, I love to create visuals in the probably most unpleasant way possible: hard thinking. Naturally, this makes me drawn to shaders, procedural materials, and particle effects. A day I brooded over a difficult problem, preferably together with others, is one well spent in my eyes.
My current goto technologies are in particular Unreal, Unity, and Substance, but I always enjoy expanding my toolset and learn something new.
